Jun, 2016
Configuring s2Member Support for PayPal
Table of Contents
This Knowledge Base Article covers configuring s2Member to work with PayPal. s2Member integrates with PayPal Payments Standard for businesses. You do not need a PayPal Pro account. You just need to upgrade your Personal PayPal account to a Business status. This upgrade is free. A PayPal account can be upgraded from a Personal account to a Business account by clicking the Profile link under your My Account tab, selecting Personal Business Information, and then clicking the Upgrade Your Account button. See this KB article for further details: Supported PayPal Account Types.
This article is part of the s2Member User's Guide, a series of articles that cover the fundamentals of using s2Member.
PayPal Pro Integration
The s2Member Pro Addon enables PayPal Pro-Forms. PayPal Pro-Forms are implemented with WordPress shortcodes. Pro-Forms allow you to keep Customers on your site at all times, consolidating the Registration and Checkout steps into a single form.
If you want to take advantage of PayPal Pro integration, you need to supply your PayPal Pro API Username, Password, and Signature. You also need a PayPal Payments Pro account. PayPal Pro accounts require a formal application, along with a monthly fee.
Once you have a PayPal Pro account, access your PayPal API Credentials. Log into your PayPal Pro account, and navigate to Profile → API Access (or Profile → Request API Credentials). From the available options, please choose Request API Signature.
Recurring Billing
If you plan to use any of the Subscription options in the s2Member Pro-Form Generators for PayPal Pro, you will also need Recurring Billing enabled for your PayPal Pro account. PayPal's Recurring Billing service for Pro accounts is required for all types of Subscriptions, whether you intend for them to be recurring or not.
However, Recurring Billing is not necessary for Buy Now functionality. The drop-down menus in s2Member Pro-Form Generators have been labeled Subscription and Buy Now to help you make this distinction.
See WordPress Dashboard → s2Member (Pro) → PayPal Pro-Forms. On these panels, you can see which options require the use of PayPal's Recurring Billing Service. PayPal charges you a monthly fee for their Recurring Billing Service in addition to the fee for PayPal Pro.
PayPal Options
See WordPress Dashboard → s2Member (Pro) → PayPal Options
PayPal Account Details
See WordPress Dashboard → s2Member (Pro) → PayPal Options → PayPal Account Details This section is REQUIRED (if using PayPal).
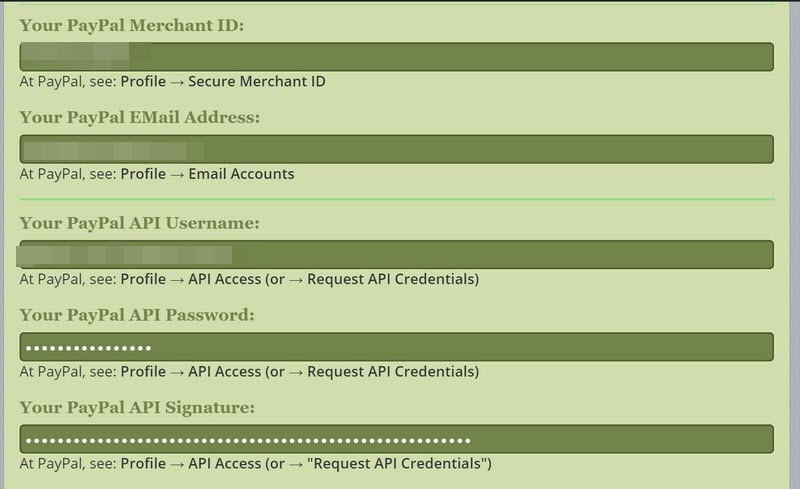
- Your PayPal Merchant ID: At PayPal, see: Profile → Secure Merchant ID
- Your PayPal Email Address: At PayPal, see: Profile → Email Accounts
- Your PayPal API Username: At PayPal, see: Profile → API Access (or → Request API Credentials)
- Your PayPal API Password: At PayPal, see: Profile → API Access (or → Request API Credentials)
- Your PayPal API Signature: At PayPal, see: Profile → API Access (or → Request API Credentials)
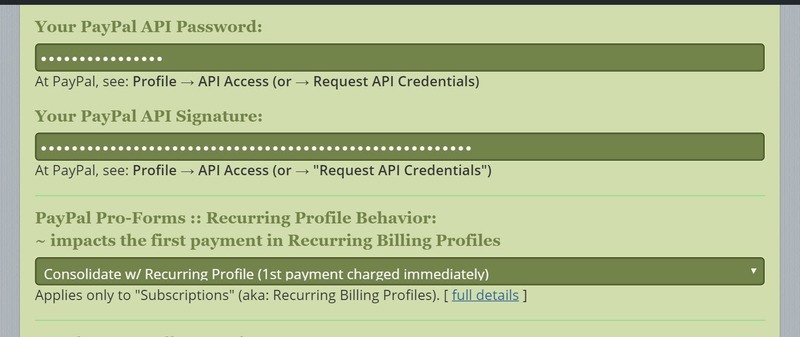
Recurring Profile Behavior
If your PayPal Pro-Form is configured to bill on a recurring basis (starting the day of sign-up with no trial period) this setting controls the way s2Member handles the first payment.
We recommend Consolidate w/ Recurring Profile because this keeps all charges associated with a particular Member organized in your PayPal account.
No matter which option you choose, a first Payment (when applicable) is always charged immediately. However, in cases where it is critical that a Member not gain access until the first payment processes completely, please choose Real-Time/Direct Pay. This tells s2Member to authorize and capture the first payment in real-time during checkout instead of consolidating it into the Recurring Profile.
Developer/Sandbox Testing?
Choose No or Yes, as appropriate. Note: We’ve found that it is often easier to test connections with PayPal in live mode with a small purchase amount rather than using Sandbox mode.
Enable Button Encryption?
If button encryption is enabled, all of your PayPal Button shortcodes are encrypted, improving security against fraudulent transactions. For extra security, you should update your PayPal account at PayPal too. See: My Profile → Website Payment Preferences. You'll want to block all non-encrypted payments. Note: this will not work until you've supplied s2Member with your PayPal Email Address and your API Username, Password, and Signature.
Payflow Account Details
See WordPress Dashboard → s2Member (Pro) → PayPal Options → Payflow Account Details This section is REQUIRED (if using Payflow).
Newer PayPal Pro accounts (PayPal Pro w/ Payflow Edition) come with the Payflow API for Recurring Billing Service. If you have a newer PayPal Pro account and wish to integrate PayPal's Recurring Billing Service with s2Member Pro-Forms, you must fill in the details on this panel.
Providing your Payflow API Credentials puts s2Member's recurring billing integration through Pro-Forms into Payflow mode. After you fill in the details on this panel (WordPress Dashboard → s2Member (Pro) → PayPal Options → Payflow Account Details), s2Member uses the Payflow Edition API instead of the older PayPal Pro DPRP Service.
Payflow API Credentials
Once you have a PayPal Pro account, you need your Payflow API Credentials. Log into your PayPal account and navigate to Profile → API Access (or → Request API Credentials). From the available options, please choose Payflow / API Access. You need the Username, Password, Partner, and Vendor.
Important Note: Supplying Payflow API Credentials here does not mean you can bypass other areas of s2Member's configuration. You must still supply s2Member with all of your PayPal account details. You configure your PayPal Pro (Payflow Edition) account here, but you must still set up other PayPal Account Details too (WordPress Dashboard → s2Member (Pro) → PayPal Options → PayPal Account Details.)
See this KB article PayPal Account Types
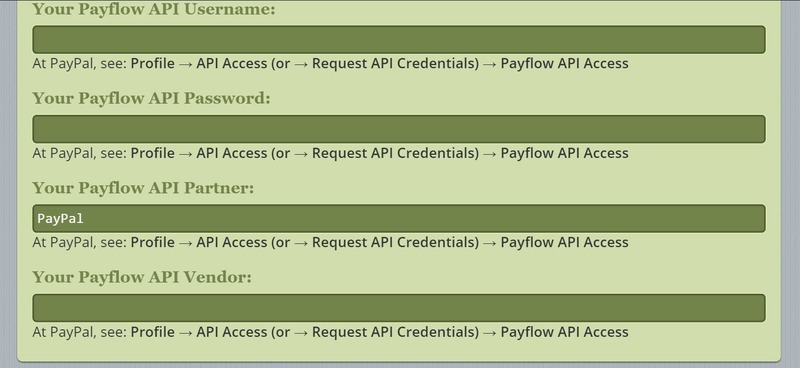
At PayPal see Profile → API Access or Profile → Request API Credentials → Payflow API Access for the following data: - Your Payflow API Username - Your Payflow API Password - Your Payflow API Partner - Your Payflow API Vendor
PayPal IPN Integration
See WordPress Dashboard → s2Member (Pro) → PayPal Options → PayPal IPN Integration This section is REQUIRED (if using PayPal).
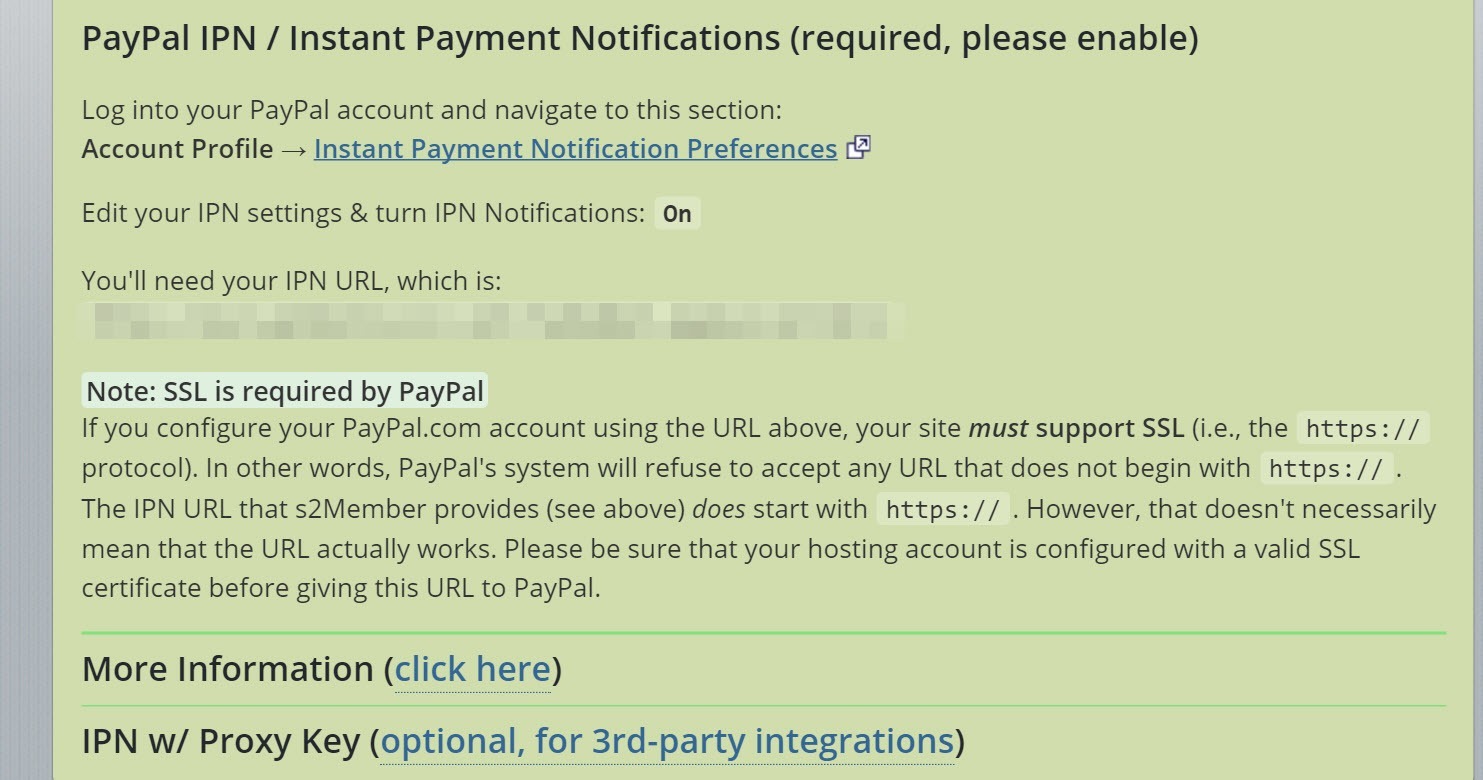
Log into your PayPal account and navigate to Account Profile → Instant Payment Notification Preferences
You need your IPN URL. Copy and paste the URL listed in this s2Member configuration panel (WordPress Dashboard → s2Member (Pro) → PayPal Options → PayPal IPN Integration) to the box in your PayPal profile.
IPN w/Proxy Key (Optional, for 3rd-party integrations)
If you are using a 3rd-party application that needs to POST simulated IPN transactions to your s2Member installation, you can use this alternate IPN URL, which includes a Proxy Key. This encrypted Proxy Key validates incoming data received by s2Member's IPN processor. You can change [proxy-gateway] to whatever you like. The [proxy-gateway] value is required. It is stored in the WordPress database as the Customer's Paid Subscr. Gateway. Your [proxy-gateway] value also appears in s2Member's IPN log.
Any 3rd-party application that is sending IPN transactions to your s2Member installation must include the custom POST variable, and that variable must always start with your installation domain (i.e., custom=example.com). Also, the item_number variable must always match a format that s2Member recognizes.
Generally speaking, the item_number should be 1, 2, 3, or 4, indicating a particular s2Member Level #. However, s2Member also uses some advanced formats in this field. Just to be sure, we suggest creating a PayPal Button with the s2Member Button Generator and then taking a look at the Full Button Code to see how s2Member expects item_number to be formatted. Other than these exceptions, all other POST variables should follow PayPal standards. Please see PayPal's IPN/PDT reference guide for full documentation.
PayPal PDT/Auto-Return Integration
See WordPress Dashboard → s2Member (Pro) → PayPal Options → PayPal PDT/Auto-Return Integration This section is REQUIRED (if using PayPal).
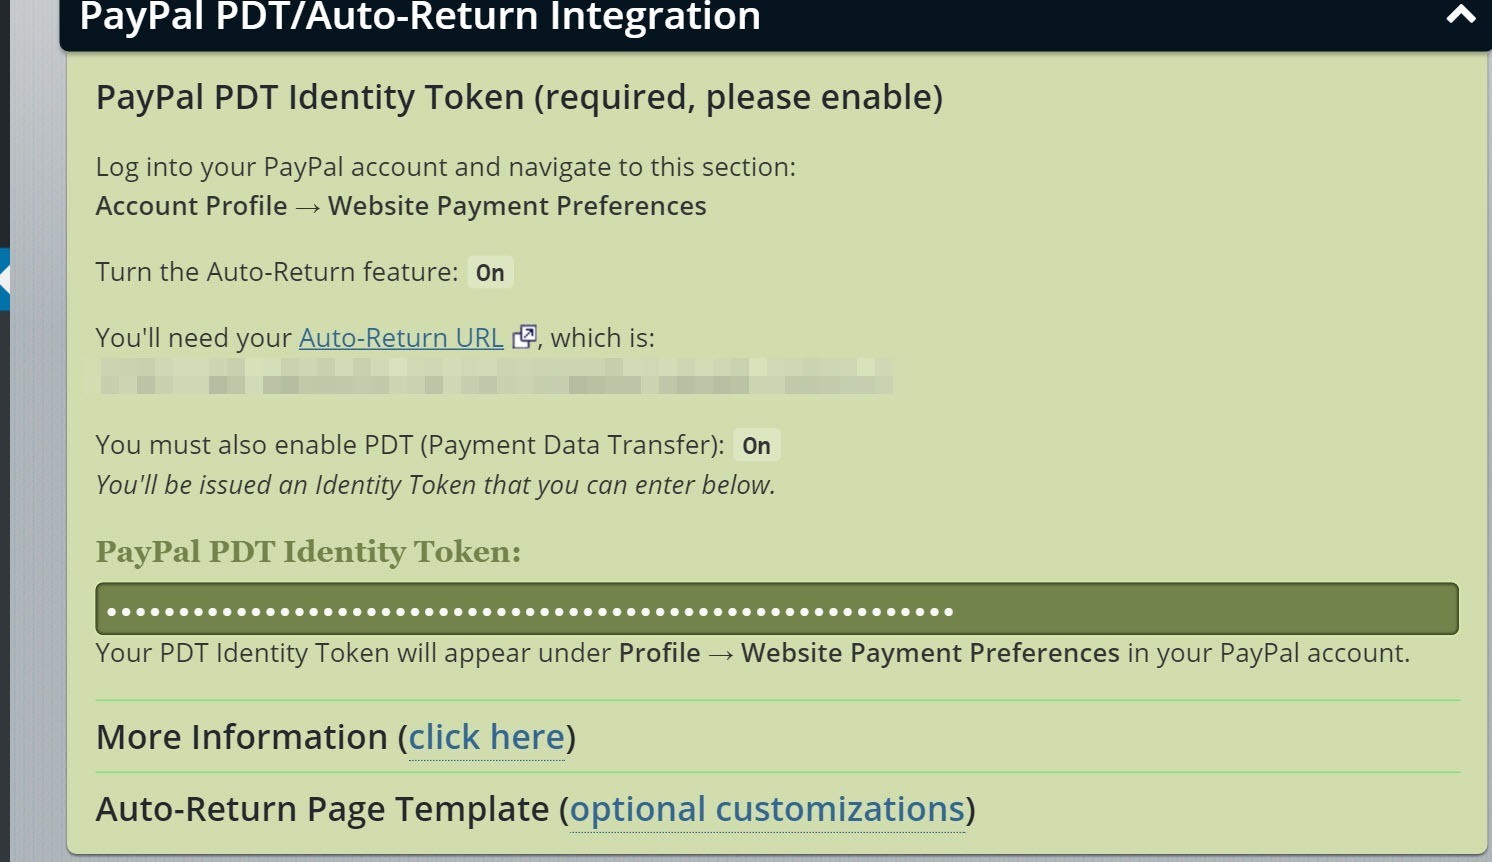
You need your PayPal PDT Identity Token (this is REQUIRED.) Log into your PayPal Merchant Account and navigate to this section Account Profile → Website Payment Preferences. Turn the Auto-Return feature On.
You need the Auto-Return URL which is listed on this s2Member configuration panel ( WordPress Dashboard → s2Member (Pro) → PayPal Options → PayPal PDT/Auto-Return Integration). Copy and paste this URL to the form in your PayPal Merchant Account.
You must also enable PDT (Payment Data Transfer) by turning it On. PayPal generates an Identity Token which you should copy and paste into the PayPal PDT Identity Token field on this s2Member configuration panel (WordPress Dashboard → s2Member (Pro) → PayPal Options → PayPal PDT/Auto-Return Integration). Your PDT Identity Token appears under Profile → Website Payment Preferences in your PayPal Merchant Account.
Tip: In addition to the default Auto-Return/PDT configuration inside your PayPal Merchant Account the Auto-Return URL is also set on a per-transaction basis from within the PayPal Button shortcode that s2Member generates. In other words, if you have multiple sites operating on one PayPal account, that is OK. s2Member sets the Auto-Return URL dynamically for each transaction. The result is that the Auto-Return URL configured from within your PayPal account becomes the default which may be overwritten on a per-transaction basis by s2Member.
PayPal Pro: The tip above (for PayPal Payments Standard) is also true for PayPal Pro integration.
Auto-Return Page Template (optional customizations)
With s2Member Pro installed, you have the ability to customize your Auto-Return Page Template. If you are using PayPal Standard integration (PayPal Buttons) each of your Customers are returned to your site immediately after they complete checkout at PayPal. Your Auto-Return Page displays a message and instructions for the Customer.
s2Member may change the message and instructions dynamically based on the type of transaction that is taking place. We do not recommend that you attempt to modify the message and instructions presented dynamically by s2Member, but you can certainly control the Header and the overall appearance of s2Member's Auto-Return Page Template.
The quickest, easiest way to do this is to add some HTML code in the box on this s2Member configuration panel (WordPress Dashboard → s2Member (Pro) → PayPal Options → PayPal PDT/Auto-Return Integration → Auto Return Page Template (optional customizations). For instance, you might include an <img> tag with your logo.
The box on the Auto Return Page Template (optional customizations) panel allows you to customize the Header section of s2Member's default Auto-Return Page Template. Everything else, including the textual response and other important details that each Customer needs to know about, are already handled dynamically by s2Member based on the type of transaction that is taking place.
All you need to do is customize the Header with your logo, and anything else you feel is important. Although this Header customization is optional, we recommend an <img> tag with a logo that is around 300px wide. After you click the Save All Changes button, you may click the hyperlink on the panel to preview your Header.
Build Your Own Auto-Return Page Template
It is also possible to build your own Auto-Return Page Template. To create your own Auto-Return Page Template please make a copy of s2Member's default template: /wp-content/plugins/s2member/includes/templates/returns/default-template.php. Place your copy of this default template inside your active WordPress theme directory, and name the file: /paypal-return.php.
s2Member finds your Auto-Return Page Template in this location, and uses your template instead of the default. You'll find details inside s2Member's default template file. Once your custom template file is in place, you can click the link on this s2Member panel to preview your header.
It is also possible to bypass s2Member's Auto-Return system altogether. For details, please read more about the success="" shortcode attribute for PayPal Buttons generated by s2Member in this KBA. See also WordPress Dashboard → s2Member (Pro) → PayPal Buttons → Shortcode Attributes (Explained).
Note: you must still configure your PayPal Merchant Account for Auto-Return/PDT (as instructed above). Then, you may use the success="" attribute in your shortcode, when and if you need it. In other words, if you use the success="" attribute in your shortcode, the initial redirection back to s2Member's default Auto-Return/PDT handler must still occur. However, instead of displaying the Auto-Return Template to the Customer, s2Member redirects the Customer to the URL that you specified in the success=”” attribute of your shortcode, allowing you to take complete control over what happens next.
If you are having problems with your success=”” attribute, see this s2Member KBA: Why is my Pro-Form not redirecting after success?